Let us see how to Block Websites with OpenDNS and filter web traffic on home WiFi with free OpenDNS service.
Step 1: Replace Router DNS with OpenDNS
You can change the DNS address of your Windows or Mac, iPhone, or Android to route traffic through OpenDNS servers. However, this needs to change each device’s DNS address and going to be a lot of work. If you want to get whole protection for an entire home network, you have to do this DNS change on the home WiFi router. Once you change the WiFi router DNS to Open DNS, the traffic to all devices connected to this WiFi router will get filtered through OpenDNS security. You have to enter the Router Gateway address on the browser to get backend access and change DNS. Please see the list of most used router gateway addresses to access the router settings.
ASUS:- http://192.168.50.1/AT&T U-verse:- http://192.168.1.254Belkin:- http://192.168.2.1Comcast:- http://10.0.0.1D-Link:- http://192.168.0.1Linksys:- http://192.168.1.1Netgear:- http://192.168.0.1
Once you are in the backend, sign in and select the Internet Tab to change the default DNS address. For those who are doing this first time, please see an article from Netgear to change DNS IP. Most of the available routers in the market follow the same steps to change the DNS IP on the WiFi router. Based on the router manufactures, there may have slight differences in these steps. See one screenshot from the NetGear WiFi router Interface and you can replace the DNS IP Address. Now you have to set these router IPs to OpenDNS Server IPs. Please use the Primary and Secondary Server IP provided by OpenDNS 208.67.222.222, 208.67.220.220 respectively. Once you set these DNS IPs, save the settings on the router and exit from the Router interface.
Step 2: Add Your IP Address in OpenDNS
In this step, you have to add your home network’s IP address to your OpenDNS account. By adding, OpenDNS will filter websites requests coming from any device connected to your home WiFi and will show only appropriate contents. Before adding your IP address to the OpenDNS, you should check whether you have a static IP or a dynamic IP. Static IP address means your Internet Service Provider gives you a permanent IP address for your network (and costs more generally). Most commonly found are dynamic IPs where your ISP randomly assigns your network an IP address and it will mostly change once you restart the router. If you have a static IP, you only have to add your IP address once and OpenDNS will take care of the rest. But for the dynamic IP, you need to install a piece of software so that OpenDNS will know whenever your IP address changes. The only way to find out your IP address type is to contact your ISP and ask. Here we have covered both methods to add your home network IP address to OpenDNS. Read along to know more.
Add Static IP Adress in OpenDNSAdd Dynamic IP Address in OpenDNS
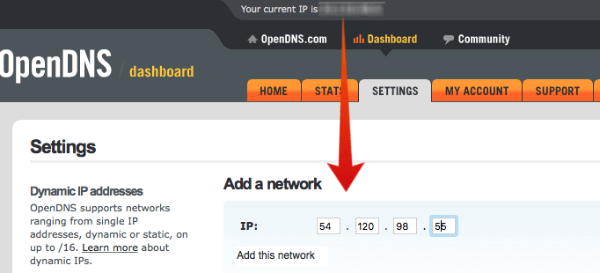
a. Add Static IP Adress in OpenDNS Account
Open DNS offers more customized control for your home network. Now you have to create a free account on OpenDNS (OpenDNS Free Account Link) and login into the dashboard. The next step is to set up a personal Network using OpenDNS free service. After you log in to the OpenDNS dashboard; You can enter the same IP address to add a network. The static IP address is depending on your ISP provider.
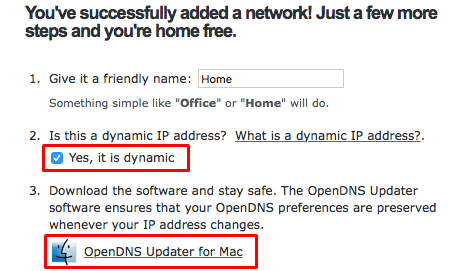
b. Add Dynamic IP in OpenDNS
Some of the providers are giving dynamic IPs for home WiFi. For Dynamic IP address, the IP address will change after a certain period. Open DNS is providing a software tool for Mac and Windows users who have a dynamic IP address. If you have a dynamic IP, you have to check the box stating that “Yes, it is dynamic.” Open DNS will offer the link to download the tool to your Mac or Windows machine. You have to install this tool on your PC or Mac to proceed further. This software tool will update the home IP address with OpenDNS account whenever your ISP provider changes your IP address. (We recommend installing this tool on your Desktop machine that kept on most of the time).
Step 3: Set Website Content Filtering with OpenDNS
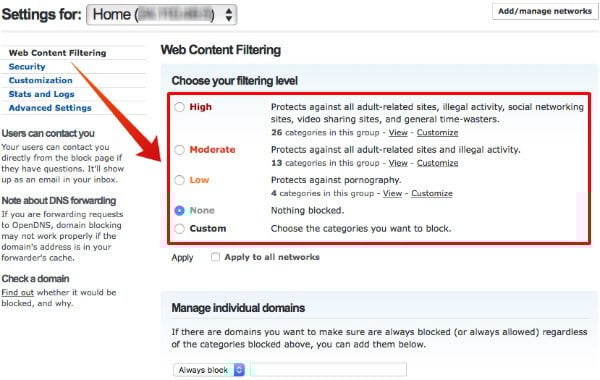
Once you set up the network successfully on OpenDNS, then you can see the screen under settings to chose the web filtering level. Make sure to select the “Settings for: Home Network” before selecting the Web Content Filtering. There are four levels of protection is offering by OpenDNS. You can customize this filtering level by adding additional categories into it.
High: Protects against all adult-related sites, illegal activity, social networking sites, video sharing sites, and general time-wasters (26 categories in this group).Moderate: Protects against all adult-related sites and illegal activity (13 categories in this group).Low: Protects against adult contents (4 categories in this group).Custom: Add the categories on your choice. You can select and filter level and add more categories to that to customize your filtering with OpenDNS.None: Skip your WiFi form all filtering and protection, but still, all the traffic will go through OpenDNS servers.
This website content filtering option is to block Adult websites from your network. You can choose the level of blocking from High/Moderate/Low/Custom. You don’t have much control here other than just selecting the level of block.
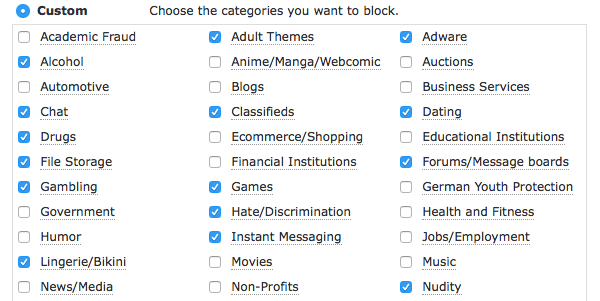
Customize Web Content Filtering with OpenDNS
If you are not satisfied with the set of filtering options, you can go for custom filtering with a category. To get this category list, you can click on Customize link from any filter level options and you will get a list of categories. You can check the categories of websites you want to block. Still not satisfied and miss some individual websites? OpenDNS offers you to block individual websites from your WiFi network for free. Move to the next topic here for blocking individual websites with OpenDNS.
Block Individual Websites with Open DNS
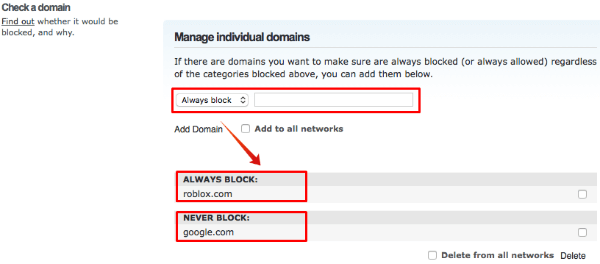
To block a website, you can use the OpenDNS service to filter individual websites. Now scroll down to the Settings page to get the option for Manage Individual Domains. This would be the most interesting part for us to get more granular control on a website that can block you from reaching your Home Router. You have a drop-down option to select Always Block or Never Block to add websites. Here you can add individual websites that you want to block. Finally, you have to save those settings and quit from the OpenDNS dashboard.
Flush DNS on Windows and Mac
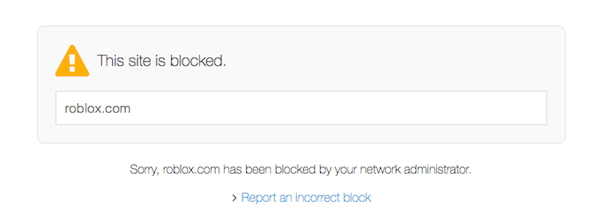
Once you add this website to the block list, your PCs may still allow these websites for a while from the cache. To get the immediate effect of this website blocking, you have to flush DNS on the PCs connected to the network. Here are the steps to flush DNS on Windows, Mac, and Linux computers.
For Windows users, type: ipconfig /flushdns in the Command Prompt or PowerShell window.For Mac users, open the terminal and type: dscacheutil -flushcache.For Linux computers, type the code: sudo /etc/init.d/nscd restart on Terminal.
If you have a different OS or PC that is not covered here, please see the complete list of commands to flush DNS here. Please be aware that DNS cache clearing is not mandatory, the system clears the cache automatically after a while.
How to Bypass OpenDNS Blocking on Personal PC
What you do if you want to get rid of this OpenDNS server from your personal device, say your Personal PC? Well, you can always bypass OpenDNS on the computer you want. You can change the DNS server on your computer to a different server address, say, Google DNS. The Google DNS servers are free to use and open your computer network setting and replace the DNS servers with 8.8.8.8 and 8.8.4.4 (Google DNS). There are plenty of other Public DNS services available for you to use if you don’t want to use Google DNS.
Open DNS Configuration: Troubleshooting
Once you set your WiFi Network, you have to make sure your traffic is going through OpenDNS servers and protected from the sites that you blocked. There are a couple of steps suggesting by open DNS to make sure you are protected. OpenDNS is a free DNS service that can be used to filter the websites on your home network for free. In addition to the pre-configured filtering, you can customize the filtering to secure your network. If you want to block individual websites from your home network, you can use OpenDNS to add these websites to the blacklist to block these sites.
Δ